The online application process consists of the following steps:
Prescreening
Registration
Family Information
Clinic Selection
Health Information (optional)
Appointments
Each step is defined below.
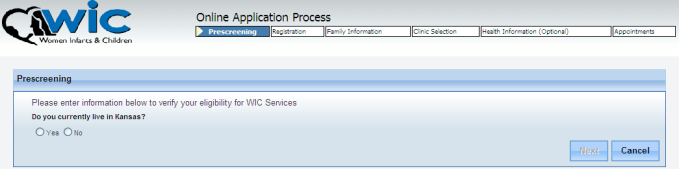
Prescreening is the first step of the online application process.
When you click the Am I Eligible? button, the following screen displays. The prescreening screen determines eligibility based on residence, category and income.
Follow the instructions below:
|
Field Name |
Required? |
Field Information |
|
Do you currently live in Kansas? |
Yes |
If you select Yes, you are residentially qualified for WIC and the system automatically prompts you to answer additional questions. (See below.) |
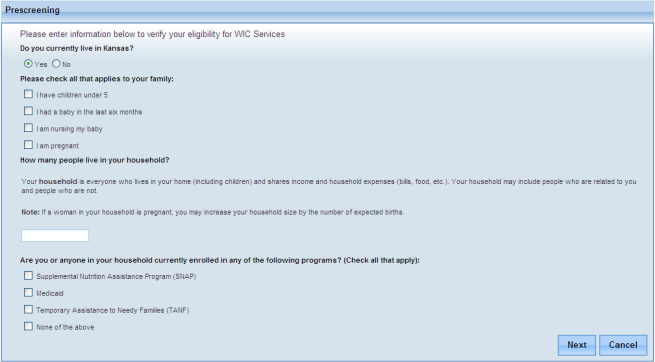
Check / enter the applicable answers in the Please check all that applies to your family section. Answers to these questions determine your category eligibility.
If you answer None of the above, the Annual Income pop-up displays.
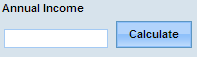
Enter your annual income. It is not necessary to enter a dollar sign ($) or periods. Example, enter 23000 instead of $23,000.00.
Click Next to proceed. Or...
Click the Calculate button if you need help in calculating your salary.
The following pop-up screen displays:
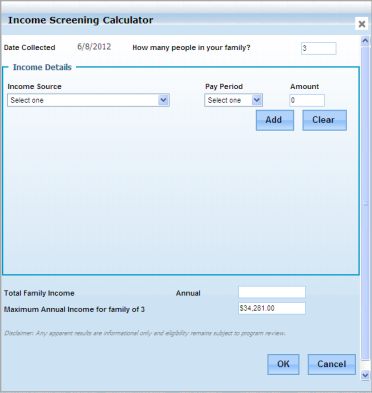
Select the income source from the Income Source drop-down menu.
Select the applicable pay period from the Pay Period drop-down menu.
Click Add to calculate. The system prompts you to add another income source, if necessary.
Click OK. The Prescreening screen re-displays.
Click Next. The system determines if you are eligible based on your entries, residentially, categorically, and annual income. If eligible, the system advances to Registration; if it determines that you are not eligible, the system displays an ineligibility statement, which you may print.
|
Field Name |
Required? |
Field Information |
|
Do you currently live in Kansas? |
Yes |
If you select No, the system automatically prompts you to answer the following question: Do you plan to move to (state)? If you answer Yes, the prescreening continues; if you answer No, the system automatically prompts you to answer the following question: Are you a WIC participant in another state? A Yes or No answer results in residential ineligibility. |
Registration is the is the second step of the online application process. When you successfully prescreen and click the Next button, the User Registration screen displays:
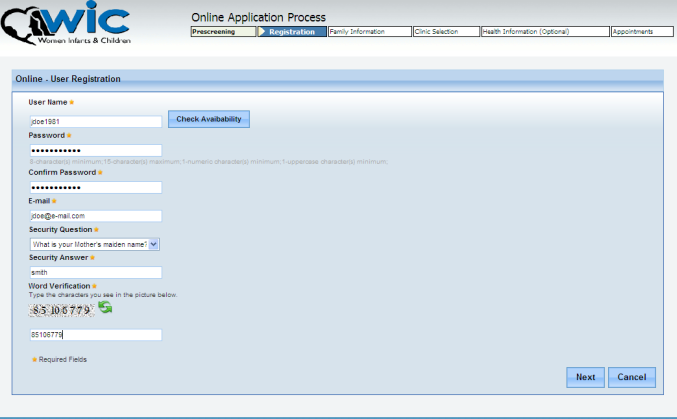
Follow the instructions below:
|
Field Name |
Required? |
Field Information |
|
User Name |
Yes |
Enter the ID you wish to use to log into the portal. |
|
Check Availability |
No |
Checks the user name ability in the system. The user name is unique, the system displays a message that the user name is available or not. |
|
Password |
Yes |
Enter the password you wish to user to log into the portal. May required special characters. |
|
Confirm Password |
Yes |
Re-enter the password you created in the Password field. |
|
|
Yes |
Enter your e-mail address, which the system uses for password resets. |
|
Security Question |
Yes |
Select the security question from the drop-down menu. |
|
Security Answer |
Yes |
Enter the security answer to the security question. |
|
Word Verification |
Yes |
Enter the word verification code. |
Click Next. The system advances to the Family Information screen.
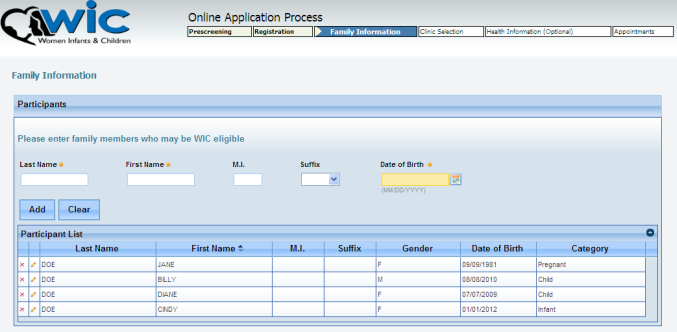
Family Information is the third step of the online application process. When you successfully register and click the Next button, the Family Information screen displays (shown below in two sections).
Add the participants individually in the Participant section of the Family Information screen.
The Date of Birth field is required and is used to determine the WIC category. Based on the determined WIC category, additional fields display. There are five WIC categories as follows:
Pregnant woman – The individual's age must be within the state-defined age range (e.g., between eight and 65 years).
Breastfeeding woman – The individual's age must be within the state-defined age range (e.g., between eight and 65 years).
Non-Breastfeeding woman – The individual's age must be within the state-defined age range (e.g., between eight and 65 years).
Child – The individual's age must be one to five years old.
Infant – The individual's age must be birth to one year old.
If the individual is less than 61 months old based on the Date of Birth, the Gender field displays. If the age is between eight and 65 years old, questions display to determine if the woman is categorically eligible for WIC as a Pregnant woman, Breastfeeding woman or Non-Breastfeeding woman WIC category.
Follow the instructions below:
|
Field Name |
Required? |
Field Information |
|
Last Name |
Yes |
Enter the participant's last name. Generally, the first participant is the adult. If no adult woman is entered in the Participant section, the Parent/Guardian section is displayed and prompts the user for information about the Parent/Guardian. |
|
First Name |
Yes |
Enter the participant's first name. |
|
M.I. |
No |
Enter the participant's middle initial. |
|
Suffix |
No |
Select the suffix from the drop-down menu. |
|
Date of Birth |
Yes |
Manually enter, or select from the calendar, the participant's date of birth. |
|
Male / Female (radio buttons) |
Yes |
Select the participant's appropriate gender button. |
Click Add for each participant that you enter. The participant information displays in the Participant List section of the screen. You may edit ![]() or delete
or delete ![]() individual lists, if needed.
individual lists, if needed.
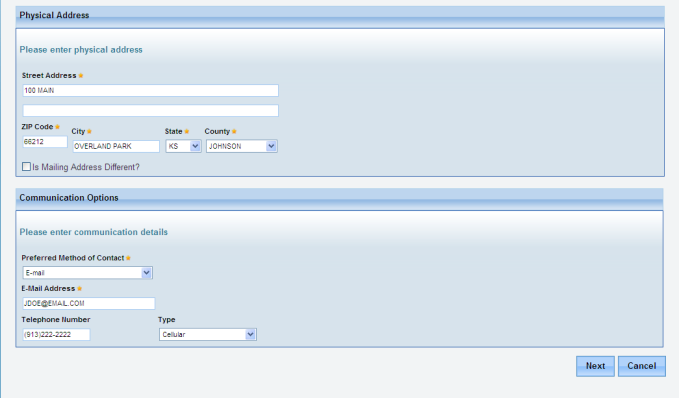
Follow the instructions below:
|
Field Name |
Required? |
Field Information |
|
Street Address |
Yes |
Enter your street address. |
|
ZIP Code City State County |
Yes |
Enter your valid ZIP Code. The system automatically displays the city, state, and county based on the ZIP Code you entered. (You may change these fields, if necessary.) |
|
Is Mailing Address Different? |
No |
Check this box if you wish to receive WIC information to an address other than the Physical Address. Another set of address fields display. |
|
Preferred Method of Contact |
Yes |
Select the preferred method of contact from the drop-down menu. |
|
E-mail Address |
Dependent |
Enter your e-mail address. This field is required if it is the preferred method of contact. |
|
Telephone Number |
Dependent |
Enter your area code and phone number. This field is required if it is the preferred method of contact. |
|
Type |
Dependent |
Select the type of telephone. This field is required if telephone is the preferred method of contact. |
Click Next. The system advances to the Clinic Selection screen.
Clinic Selection is the fourth step of the online application process. When you successfully add family information and click the Next button, the Clinic Selection screen displays, showing WIC locations based on your street address.
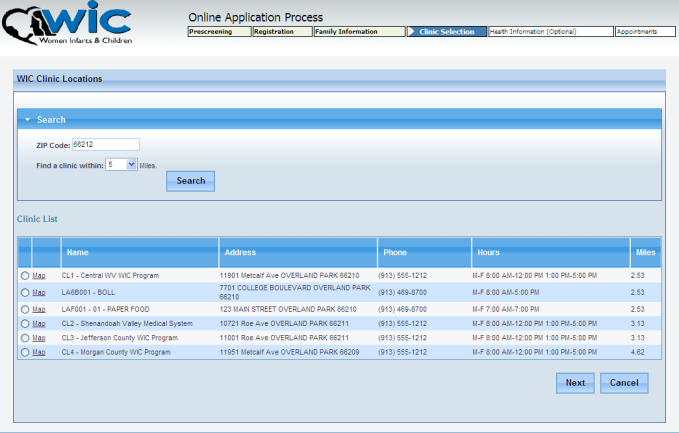
Follow the instructions below:
|
Field Name |
Required? |
Field Information |
|
Select location (radio button) |
Yes |
Select the radio button next to the preferred WIC Location. |
|
Map |
No |
Click the Map link to display a map of the WIC location. |
|
Name Address phone Hours Miles |
Display Only |
The system automatically displays this information. |
Click Next. The system advances to the Health Information screen.
Health Information is the fifth step of the online application process. When you successfully select a clinic and click the Next button, the Health Information screen displays. This screen allows you to respond to various health questions for each participant. Since this screen is optional, you may skip to the Appointment section of the process. The category of the applicant determines the types of questions. Below is an example of the Health Information screen for pregnancy:
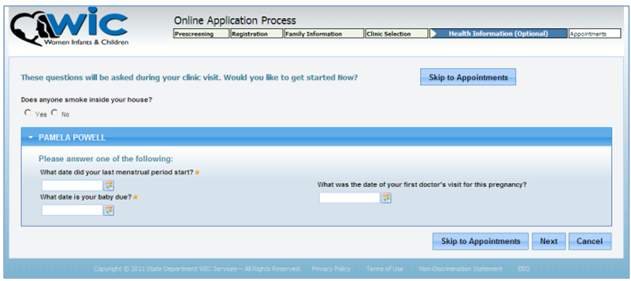
Skip to Appointments (button) Enables the user to forego completing the health information screen and advance to the appointment scheduling screen.
Next (button) Directs the user to the next screen in order for the process to be completed. (Click this button only if you have answered the questions.)
Cancel (button) Discards any changes that have not been saved and redirects the user to the previous screen in the client established work flow or the prior screen displayed.
Appointments is the sixth step of the online application process. When you successfully add health information and click the Next button, or click the Skip to Appointments button, the Appointments screen displays.
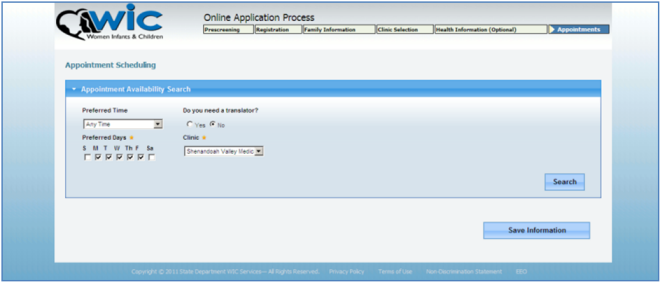
Follow the instructions below:
|
Field Name |
Required? |
Field Information |
|
Preferred Time |
No |
Search by selecting the time of day from the drop-down menu. |
|
Preferred Days |
Yes |
Search by selecting the day from the drop-down menu. You must select at least one day. |
|
Do you need a Translator? |
No |
Select Yes if a translator is needed during the appointment; or No, if not. If you select Yes, the screen displays a language drop-down menu. Select the applicable language. |
|
Clinic |
Yes |
Search by selecting the clinic from the drop-down menu. |
Click Search. If there are no appointments available in the clinic selected, a pop-up message displays to indicate this unavailability.
Click Save Information if no appointments are available.
If there are available appointment slots, select from the list based on the search criteria.
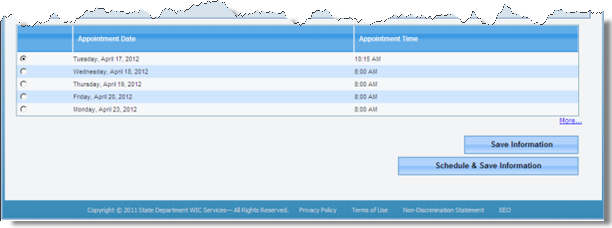
Click Schedule & Save Information. An Appointment Details screen displays:
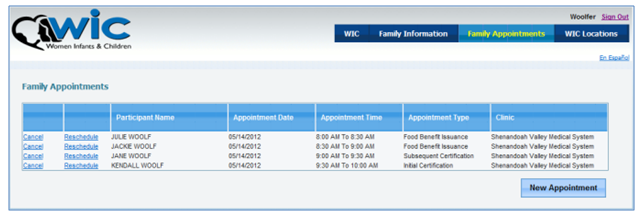
Print, cancel, reschedule, and/or schedule new appointments. Use the browser print menu option to print the appointment details.
Click Cancel in the Family Appointments list in order to cancel the selected appointment. The system displays a cancellation confirmation message and asked for a reason for the cancellation.
Click Cancel. Or, click Close if you decide not to cancel the appointment.
Click Reschedule on the Family Appointments screen to reschedule the selected appointment.